Pin the Tail on the Donkey
Goal:
The player of the game has to click the mouse where the donkey's tail will go. The problem is, the picture keeps disappearing!
Steps:
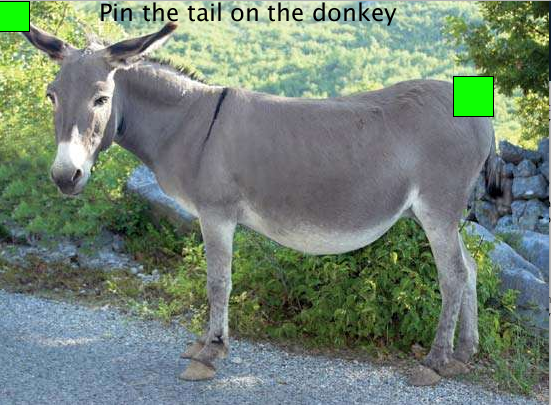
This recipe uses two bounding boxes. One is in the top left corner of the sketch, the other is a target area where the donkey tail should be pinned. In the recipe image, the bounding boxes are colored green to help demonstrate the concept, but you won't see them when playing the actual game.
- Find the Pin the Tail recipe program in Eclipse.
- Find a picture of a donkey and a separate picture of a tail (tail needs a transparent background).
- Save the images to your Desktop.
- Drag and drop each file onto your sketch.
- Load the pictures into variables as follows.
- First create (declare) variables to hold the images at the top of the sketch.
PImage donkey;
PImage tail;
- In the setup() method, set the variables to hold the images.
donkey = loadImage("donkey.jpg");      //change the file name if you need to
tail = loadImage("tail.png");      //change the file name if you need to
- First create (declare) variables to hold the images at the top of the sketch.
- In the setup() method, set your canvas size to EXACTLY match the size of the donkey image. You can get the size of the image from the file information on the Desktop.
size(width, height); //replace width, height with your picture's dimensions
-
Draw the donkey and tail in the draw() method. The tail should move around with the mouse. Try it!
background (donkey);
image(tail, mouseX, mouseY);
- If you need to, resize the tail to fit onto the donkey. Since this is done ONCE, put this code into the setup() method.
Note: if you leave height or width as zero, the image will scale proportionally.
tail.resize(width, height); //replace width, height with your tail's dimensions
- If the top of the tail is not in the top left corner of your image, you will have to adjust the x and y values so that the top of the tail is drawn where you click the mouse. To do this, you would need to adjust the x and y values to make your image work as shown below.
image(tail, mouseX-10, mouseY-20);
- Now we are going to start adding bounding boxes! These should go in the draw() method, AFTER the background is drawn!
- First draw a bounding box (rectangle) in the top left corner of the sketch.
rect(0, 0, 30, 30);
- Now we need to draw another bounding box where the tail should go. You can use mousePressed to help you figure out the x and y coordinates of the corner of this rectangle (see the picture at the top of this page for an idea of what this will look like). Example:
rect(454, 75, 40, 40);
- First draw a bounding box (rectangle) in the top left corner of the sketch.
- Now, change your code so the donkey is only shown when the mouse is inside the corner bounding box. Hint: use the dist() command:
dist(0, 0, mouseX, mouseY) < 30
When the mouse is outside the corner box, you should show a solid color background. - Now, adjust your code so the tail sticks when you click the mouse (this means it will no longer move when the mouse moves). Hint: you will need to save the x and y values in variables at the top of your sketch.
- When the tail has been pinned, write code to check if the tail was pinned inside the target bounding box. You can use dist() like you did earlier, or you can write your own code to check it another way. Show the donkey so the user knows where they pinned the tail.
- If the tail is in the right place, the player wins and you play a sound. To play a sound use the following code
playWhoohoo() - When you have tested that your pogram works, remove the line of code that draws the tail target bounding box and see if you can pin the tail on the donkey.
- Make sure you SAVE YOUR CODE when you are done.
- OPTION: Add some text to give the user instructions on how to play the game.
textSize(24);
text("Message",100,20);